7 Things in My Pakistani Kitchen That Make Cooking Easier + Quicker


I’ve recently been down and off the scenes due to an unfortunate bout of the dreaded carpel tunnel syndrome. For those who don’t know what that is, it’s some pretty painful nerve pain in the wrist and fingers which limits my hand movement and grip.

It’s not severe, thankfully – but I do still need to take it easy and rest my hand as much as possible. So naturally, one of the areas this has impacted me is in the kitchen.

We’re on month 3 of life with carpel tunnel, and during this time I’ve learned A LOT about how to optimise things in the kitchen for the sake of my wrists. This spurred on the idea for this post – things I use around the kitchen to make things easier, which would do you good too. I’ve always been big on having an arsenal of tools that help make cooking easier and quicker, whilst still maxing out on flavour. The last 3 months have just really drilled home the importance of that arsenal.

Note that not all of these recommendations are directly related to my carpel tunnel. I’ve been completely unable to use a knife or do a lot of my usual cooking, but everything I’m sharing with you are things that have helped me out on a regular basis. I hope you find some inspiration from this list!

Uses: to make cooking easier, quicker and more hands off (amongst a plethora of other things). Full review here.

This gadget tops my list. Quite frankly, this single purchase has totally transformed the way I cook and approach my time in the kitchen.

A traditional, standard stove-top pressure cooker is not for the faint hearted… or the forgetful, or those occupied with a dozen other tasks. In a nutshell, the Instant Pot takes all the stressful elements out of a stove-top pressure cooker, with extra perks too.

I’ve always owned a stove-top pressure cooker but rarely used it. I absolutely despise keeping track of when it’s sealed, so I can calculate when to turn the heat off – because even an extra minute or so of pressure cooking can mean overcooked food. If you have kids, you’ll know sometimes you just can NOT stick to those times. An urgent, catastrophic fight, a spilt drink, an emergency booty call – you know the drill.

With the Instant Pot, the timer function throws all those worries out of the window. You want to cook your mutton for 15 minutes? Set it up for 15 minutes, and walk away like the effortless domestic queen/king that you are. I can attend to any offspring emergencies, put the kids (or myself) to sleep, engage in lengthy calls and even leave the house and I need not worry for a single moment about the food I’m cooking because that baby will turn off in 15 minutes 💅🏼.

The Instant Pot I have is particularly neat because it also has an air-fry, bake, grill and dehydrate setting. I use the air-fry setting almost daily and I *love* how much use I get from this one device.

To read more about my Instant Pot, I wrote a full review about it here.

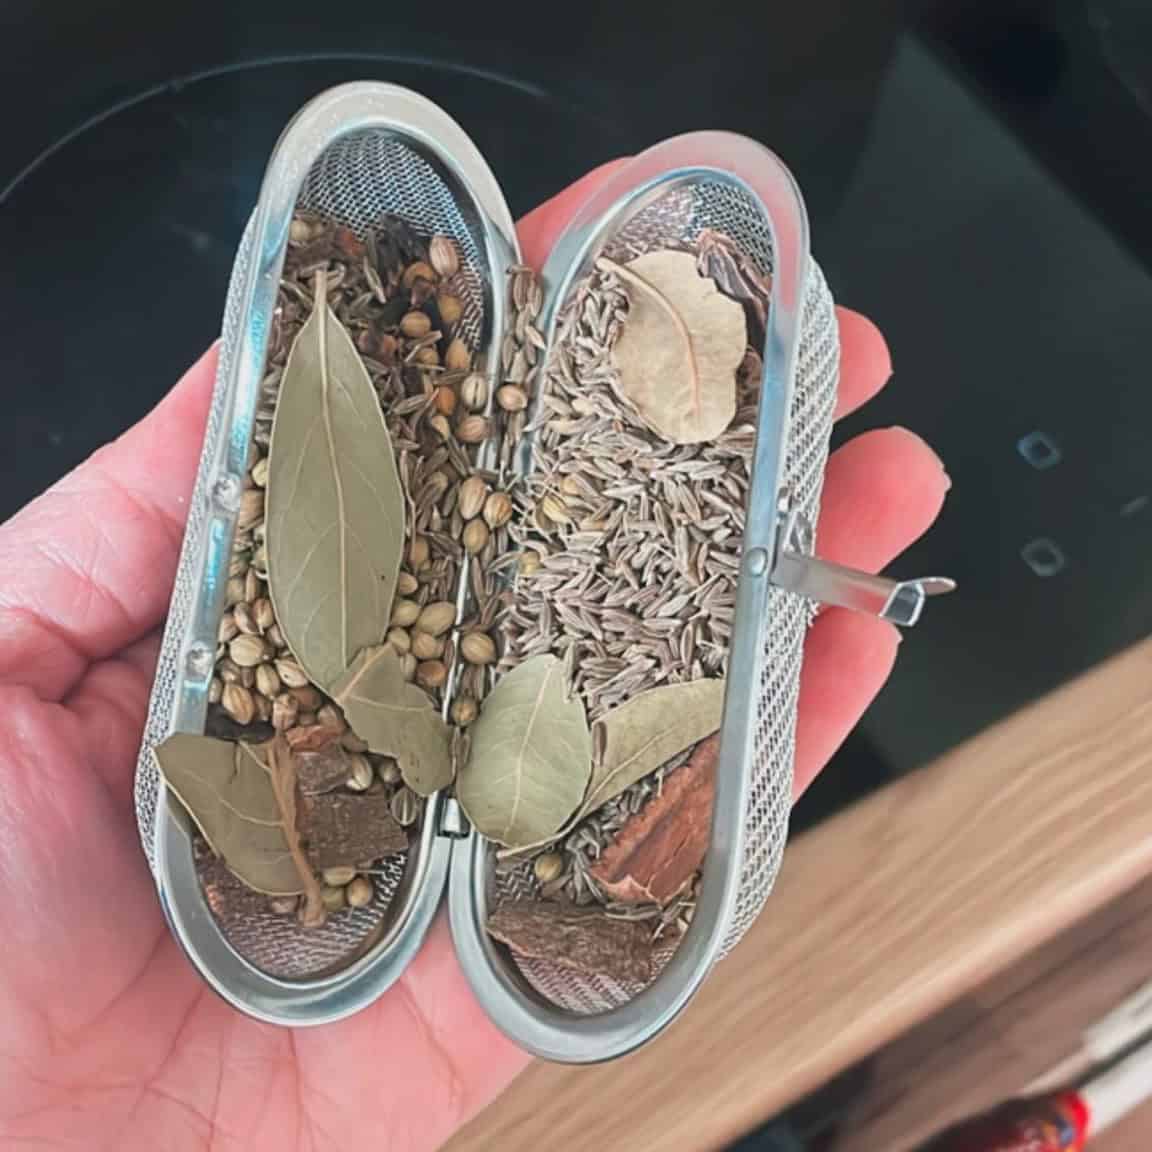
Uses: to conveniently infuse the flavour of whole spices into food, without needing to fish them out manually afterwards.

Spice infuser

I’m a pulao girl through-and-through. My pulao recipes all use a heavy hand on the whole spices. But hey, no one likes biting into peppercorns and cardamoms. In the past, I’ve used a muslin cloth or a clean, permeable dish cloth to create a spice ‘bag’ – a potli, to wrap the whole spices in, so they infuse into the rice and can be removed seamlessly.

And this works great, but sometimes I’m a lazy girl and forget to wash my cloth. Or I forget to buy new ones. I can’t be the only one, surely.

I purchased this spice infuser a while back and it has categorically made making pulao SUCH a breeze that I can’t believe it took me 10 years of cooking to discover it. It would work great for anything you want to infuse a heavy hand of whole spices into, like Korma. It would even work great for masala chai!

Uses: to chop finer and quicker, which reduces cook time and improves food texture

I was very tempted to call this recipe post 'My Chicken Pakora Science Experiment' because... guys, this was literally a full-blown science experiment. With multiple hypotheses... Testing different variables... Many observations noted in my handy dandy recipe notebook (which is now conveniently stained with pakora batter)... We ran out of funding (boneless chicken, gram flour, coriander, you name it) several times during the research trials, and I had to apply for renewed funding (asking the husband to keep popping to the Pakistani grocery store). But you know what? It was ALL worth it because not only did I get the recipe for the BEST Chicken Pakora EVER, but I now I FINALLY UNDERSTAND THE SCIENCE BEHIND IT ALL!  I'm going to dive right into this - I have SO much to share with you guys! If all that information is not your thing and you just want the darned Chicken Pakora recipe, feel free to jump to the recipe and get to the meat (pun intended). What makes a good Chicken Pakora? I've had a number of chicken pakoras in the past and have also tried my hand at making them plenty of times too. And mostly, I've been left disappointed with either a soggy coating, tough and dry chicken, lacklustre flavour So what did I do? I trialled A LOT of different batters to try and find the elusive Chicken Pakora that is... Flavoursome... like actual delicious flavour in the batter and also in the chicken  Crispy on the outside - kinda like a chicken nugget, but make it Desi Moist! Not dry - nuh-uh! Neither the chicken, nor the coating should be dry! We want juicy tenderness from the meat, and a crunchiness from the batter that isn't drying or heavy Not oily!  How to get that PERFECT Chicken Pakora batter it didn't take me too many trials to get the flavour and spice mix for the Chicken Pakoras just right. What took a while was getting the texture of the batter right. And by 'a while' I mean about 8 or 9 times. I lost count. So during my research, I got down to three elements that make a HUGE difference in getting that crispy, light yet crunchy coating: Bicarbonate of soda Using gram flour + an additional flour (read about it ahead!) Using ice cold water (cold unflavoured sparkling water is a BONUS!) I'm going to break down the elements now. And again, if you don't want to read about it all, feel free to scroll past and get to the recipe BUT I always find knowing about all these different things really helps gain knowledge what can be transferred to other recipes too! 1. Using bicarbonate of soda in Pakoras Bicarbonate of soda is a pretty well-known Pakora batter ingredient. This certainly may not be big news to anyone. But I had to do a trial run of this just to see how much of a difference it makes. So I tested out three batters - one with no bicarbonate of soda, one with a small amount, and one with an increased amount. And ladies and gentlemen, it makes a BIG difference.  It takes the batter from flat to airy and enhances the crisp-factor.  There was a definite increase in airiness and crispiness between the batter with less bicarbonate of sofa and the one with more. Also, the shape of the Pakoras changed too - they puffed up more - a shape I preferred! So summary of all this is - Do NOT skip the bicarbonate of soda! 2. What flours to use for the Pakora batter In the past, I've always made the batter with just gram flour. And it was always lacklustre. Just meh. Like yes ok, Chicken Pakora, but not WOW OMG CHICKEN PAKORA, if you get my drift. So I decided to experiment with different flours. I asked around, looked at other recipes, spoke to my wonderful Instagram community and I could see the same 3 ingredients being recommended the most: cornflour, rice flour and semolina.  So I did what any sane mad scientist would do and set up a little science experiment. I trialled different pakora batters - first I did 3 sets, one with gram flour + cornflour, one with gram flour + rice flour and one with gram flour + semolina. I did all these WITHOUT bicarbonate of soda because I wanted to see the impact of the flour without the rising aid from the soda, to get a true idea of what the flours actually do. Here is what my results showed! Gram flour + semolina (2:1 ratio) This was my least favourite out of the bunch. It did make the batter crunchier than a standard gram flour batter, but it felt dry, dense and heavy.  Gram flour + rice flour (2:1 ratio) This batter was a lot better than the previous one. The pakora coating had a crunchy bite to it which I enjoyed and the texture of the batter was lovely too.  Gram flour + cornflour (2:1 ratio) This batter turned out to be my favourite out the three I had trialled so far. The batter was crispy and light. Having said that, I will say it was VERY SIMILAR to the rice flour too. An almost unnoticeable difference. After these trials, I decided to combine some of them (extra, I know) because, well I was at it anyway so why not? In the name of SCIENCE! Gram flour + semolina + cornflour (4:1:1 ratio) I trialled this hoping the crunch from the semolina plus the crispy lightness from the cornflour may work together to create something good but I was really disappointed in this. Semolina has firmly been wiped off the charts for me... it was making the batter too tough and dense, defeating any crispy Chicken Pakora aims of mine Gram flour + cornflour + rice flour (4:1:1 ratio) OK, so THIS was a really goooooooooooooooood one! I felt like this combination gave the perfect degree of light crispiness whilst also giving it a crunch I really really wanted it to get.  So, what ARE the best flours to use in the Chicken Pakora batter? After doing ALL those trials out, I have finally come to the conclusion that gram flour plus ANY combination of rice and/or cornflour is the WAY TO GO!  They both aid in giving the Pakora batter more texture than gram flour alone.  Despite my unscientific scientific trials finding gram flour + cornflour + rice flour to be the best combination, I have to be HONEST with yall and tell you it wasn't a significant difference. Like, I won't tell you your Pakoras won't be absolutely delicious if you don't use all those flours. The cornflour makes the batter crispy and light, the rice flour also makes them crispy and light You can make your decision of what kind of batter you want based off that! You just got cornflour at home? Sounds good! Only got rice flour? That's OK too, just use that! You wanna use all 3? Go for it!  Whichever way you decide to do it, using rice/cornflour will turn your Pakora batter from 'meh' to 'yum!' 3. Using cold water or sparkling water in pakora batter Out of the first two elements I mentioned, I think this is the least impactful element BUT it does make a noticeable difference.  Water as cold as you can get it helps keep the batter light and airy as it helps the batter not absorb much oil.  If you can get your hands on some UNFLAVOURED sparkling/soda water, that is awesome! There's something about the fizziness that helps get things even more crisp. I first saw this on a Jamie Oliver show many moons ago and was reminded about it from my Instagram community. And it DOES work.    What other ingredients are in Chicken Pakora? After A LOT of fine tuning (And I mean A LOT), this is what my BEST Chicken Pakora recipe contains: Boneless chicken, chopped into bite-sized pieces. More on this further on. Fresh coriander - adds a very characteristic flavour and fragrance which is so universal to South Asian flavours Lemon juice - not only does this add a very nice zing, it also helps keep the chicken soft! A lovely array of spices, including salt (of course), cumin powder, coriander powder, chilli flakes and chilli powder Dried fenugreek (kasoori methi in Urdu) adds a fragrance and flavour which matures the flavour in a very subtle way Green chillies, chopped finely - I feel like THIS really gives this recipe such a BEAUTIFUL kick! If you cut them quite fine, it doesn't feel like your mouth is on fire, rather it just feels like the pakora is scattered with a few zings of juicy heat here and there. My 1 year old LOVED these pakoras and did not seem to be bothered by any heat, and I too personally felt like this pakora was NOT spicy with my quantities. If you want to work around the spice levels, please read further into the post for adjustments. Garlic - This added beautiful depth too. I tried ginger too and tbh, personally I didn't find it added much. You can add ginger if you want anyway, though!  And of course, as mentioned above, gram flour and rice flour and/or cornflour to get that perfect crisp coating. What kind of chicken should I use for Chicken Pakoras? Thigh or breast pieces? Both are A-OK - thigh is juicier and more moist, but breast is more firm and you may find it's easier to get your butcher to dice them into a better cubed shape. It's totally your preference.  Cooked or raw? I have trialled this recipe with both and my personal preference is raw. TREMENDOUSLY. The reason for this is twofold: I found cooked chicken to become very tough, dry and chewy. And it makes sense - when you cook the chicken (assuming you boil/steam it), the moisture from the chicken will be drawn out. And then you cook it some more - can you see where this is going? I personally found pre-cooked chicken breast UNBEARBLE to eat, even though when cooked from raw it was fine! Also, CONVENIENCE! If you are making these pakoras from scratch, there's no need to spend time pre-cooking them! They're better without that! Boneless or bone-in? I am firmly in team boneless here, but again, it's your call. Chicken Pakora technically CAN be cooked with bone-in chicken too if that's whatcha like! They will likely need some more time frying though, to ensure the chicken is cooked through How to make Chicken Pakoras Start off by mixing the following ingredients: all the spices, gram flour, rice flour and/or cornflour, chopped coriander, minced garlic, chopped chillies and lemon juice. Mix all these until well combined, ideally with a whisk to get any pesky clumps from the flours Add in the chicken, and then a small amount of water.  Stir the mixture, adding water a little bit at a time until the mixture become a thick but fluid - kind of like the texture of PVA glue - smooth, but thick. Be careful with this - a batter too runny will mean the coating won't be as crunchy and flavourful.  Next, preheat some oil in a pan or karahi. You'll know the oil is hot enough when you drop a bit of the pakora batter into the oil and it floats back to the top, sizzling away.  Drop in the coated chicken pieces, one at a time. Don't overcrowd the pan, it messes with the temperature of the oil and can lead to limp, dull pakoras. Fry the pakoras, turning them occasionally if they need a flip, but don't touch them too much. Once the batter is crispy and a deep gold, drain the pakoras well using a slotted spoon before bringing them onto a colander lined with tissue to drain some more while you continue to fry the rest of the batter. Some additional Chicken Pakora tips to help you Running the flours through a sieve before adding them in will also help with that whole crispy, lightweight vibe we're going for ;-) It's always good to do one test pakora before throwing them all into the frying pan. Do just one and have a taste of it. Feel like you want to adjust the salt or spice? Go ahead, you've just saved the entire batch from not living their best Pakora life. Thank me later The temperature of the oil is really important to ensure your pakoras are cooked properly. I can't give you an exact temperature (because I'm DESI and we work with ANDAZA - ha!) but if you put in the pakoras and they begin to turn brown rather quickly, the oil is definitely too hot. And if they don't seem to be catching colour, it's definitely too cool. I find preheating the oil for 5 minutes, doing 2 small batches on high heat, then turning down things down to a medium-level for any further batches works best. Further to that point, just another reminder to work in small batches and not overcrowd the pan, as tempting as it may be :-) Many restaurants add a bit of red food colouring to their Pakoras. I haven't but if you like that look feel free to add a bit. How long can I keep Chicken Pakora batter? OK so, this may not be what you want to hear but... once the chicken mixture is combined with water, it doesn't actually keep so great. They just loose their awesomeness. The coriander and chicken release moisture into the batter and it messes up all the ratios. You CAN fix the excess moisture by adding in some gram flour, but it just isn't the same.  Due to this, I don't recommend making wet batter in advance.  If you want to do some sort of advance, you can mix up all the ingredients minus the water and chicken and then add in those when you're about to fry. If you want to make half a batch now and half a batch later, just mix up all the ingredients minus the water and chicken, then reserve half of it for later and add the water and chicken into the other half. How do I reheat Chicken Pakoras? The best way to reheat chicken pakoras is in the oven, at about 180c uncovered for 10-15 minutes. Do not keep them in the oven for too long - once they are heated through remove them immediately otherwise they may become dry. It may be tempting to heat them in the microwave - but this will make them soggy and soft and definitely not crunchy!  What goes well with Chicken Pakoras? Chicken Pakoras go really well with a sauce or chutney with a bit of a zing to them. During my taste trials, I was enjoying them alongside this potent tangy and spicy  chutney from Chai and Churro's Bun Kebab recipe. I can also imagine these would go well with any sweet and spicy sauce. You can also serve these with a few wedges of lemon and a sprinkle of chaat masala if you fancy! Other variations Feel free to use this batter with fish, prawns, potato slices, onions, anything really! You can also use this batter with minced/ground meat (keema) too. Make sure you ask for superfine minced meat - if you get yours from the butchers ask them to run the meat through the machine twice for that SUPER superfine keema! You can also add some finely chopped onion into this batter too - add as much as you want! It will add a good crunch and works well with all the flavours. Other recipes you may enjoy Vegetable Pakora | Plum Chutney | Keema Samosa Filling

I never really understood people who got excited over cooking knives. I just want to cut an onion, how much luxury do I need?

Well, I was wrong. I was actually sent a pair of serrated knives as a gift from an Etsy seller who is sadly no longer active, and they’ve created a domino effect in the kitchen for me that goes like this:

  1. I chop my onions and tomatoes. Because the knife is so precise and sharp, I get an excellent super fine dice, which is very satisfying.
  2. Because the knife is so sharp, I whizz through it at speeds I never knew were possible, saving me time.
  3. Because the onions and tomatoes are finely diced, they melt into my curries quicker, saving me more time.
  4. Because everything integrates so beautifully into my curries, my food has a better texture and visually looks better. And also, I don’t need to get out an immersion blender to get a smooth texture.

See that domino effect? You’ll never go back once you know this life.

I’ve linked the style of knives I use and love here.

Uses: for smooth bases for curries like Aloo Gosht, for quick raitas and chutneys without the hassle of a stand-alone blender.

This is a godsend for times when you need something smooth ASAP and don’t have the time to chop anything finely or wait around for things to cook down. The immersion blender wins my heart over a countertop blender because it’s very convenient to whip out, you can blend directly in your cooking pot, and it doesn’t take up valuable kitchen real estate.

I recommend getting an immersion blender with a detachable blades because it makes cleaning up a lot easier. I recommend this one.

Uses: convenient way to mince fresh garlic

If you love fresh garlic, but have trouble doing it in bulk as an efficient and wise individual would, and don’t love doing it fresh in a blender/pestle and mortar every time, I’ve found this garlic press hits the right balance for me.

I prefer the shape of the garlic press pictured above because I just find it easier to clean and use than the more standard kind you can see here – but honestly, you can pick whichever you prefer!

Uses: hands off dough kneading in an appliance that has other functions not just related to dough

We’re a roti family through-and-through, but one thing I am NOT is a fan of kneading the dough. And with my recent struggles with carpel tunnel, kneading has been a total no-go area for me.

I purchased this food processor a while back, and my biggest requirement for it was a kneading attachment along with all the other usual attachments. Who doesn’t like an appliance that does multiple jobs in one? I adore how much space it saves, how cost-efficient having one appliance is over having several, and of course I love having all those jobs done for me 💅🏼

In terms of kneading dough, it isn’t as streamlined as a Kitchenaid would be, but that’s fine by me. I’m a simple gal. As long as the job is getting done, I’m not complaining.

This food processor also has a chop, grate and emulsify setting which come in handy too.

Uses: to quickly crush whole spices into powder

Admittedly, this hasn’t been getting much love since my carpel tunnel conundrum. But I’ve always prefer a pestle and mortar over any other appliance to crush my whole spices. Maybe it’s just in my head, but I’ve always found it quicker and easier to clean up afterwards, and I love the control over how fine I get my spices. I think my preference originates from when my kids were younger and a sudden loud noise would have woken them up from their precious naps.

Also, using freshly ground spices really elevates the flavour profile SO much. My Kofta and Palak Chicken recipes also start with this process for this very reason.

Word of note though, your pestle and mortar needs to be made of a good, solid material for this to be of any use to you. If your pestle and mortar is made out of a light wood or steel, it’s going to give you GRIEF getting them ground down into a powder. I recommend using marble or granite – the spices break down SO quickly and easily in here!


Another thing I’ve been wanting to add to my kitchen arsenal since my carpel tunnel is this nifty vegetable chopper box. Maybe at some point I’ll get it, and will then report back with my thoughts on it.

Until then, I’d love to hear about what you use around the kitchen to make cooking easier and quicker for you. Please do leave me a comment sharing, I’m eager to know!

With love,

Fatima x

More Time Saving Kitchen Tips

Reader Interactions


Leave a Reply

Your email address will not be published. Required fields are marked *